

RemoteView Login Security Guide: How to Set Up 2FA and Google/Microsoft SSO
A remote access service is a direct path to your company’s work PCs and critical assets. That makes the first gate, login account security, just as important as encrypting the remote session itself.
RemoteView offers two-factor authentication (2FA) and Google and Microsoft sign-in (SSO) so you can manage accounts securely and conveniently, in line with your company’s security policy and the way your team works.
This guide walks through how to set up and use both features, step by step, split by role: administrators (initial policy setup) and users (day-to-day verification and sign-in).
1. Why does your login need two-factor authentication (2FA)?
If you reuse the same password across several websites, or your credentials are exposed through phishing, someone else can try to connect to your work PC remotely without your permission.
Two-factor authentication (2FA) is a second lock. After you enter your RemoteView ID and password, you confirm it’s really you with a code sent by email or generated by a mobile authenticator app (OTP). In RemoteView, this feature appears as 2-Step Verification. Even if your password leaks, no one can sign in without that extra, real-time verification.
2. [Before you start] Checklist before turning on 2FA
Before an administrator turns on 2FA for the whole company, complete the two steps below in order so that no one gets locked out at sign-in.
STEP 1. [User] Check the email address on your account
To receive a 6-digit verification code by email, or the key you need to set up OTP for the first time, your account must have an email address you actually use today. Check yours before your administrator turns on 2FA.
Where to check: Sign in to the RemoteView web console → [Preferences] → [My Profile] → check and update [E-mail] under [Verification Settings]
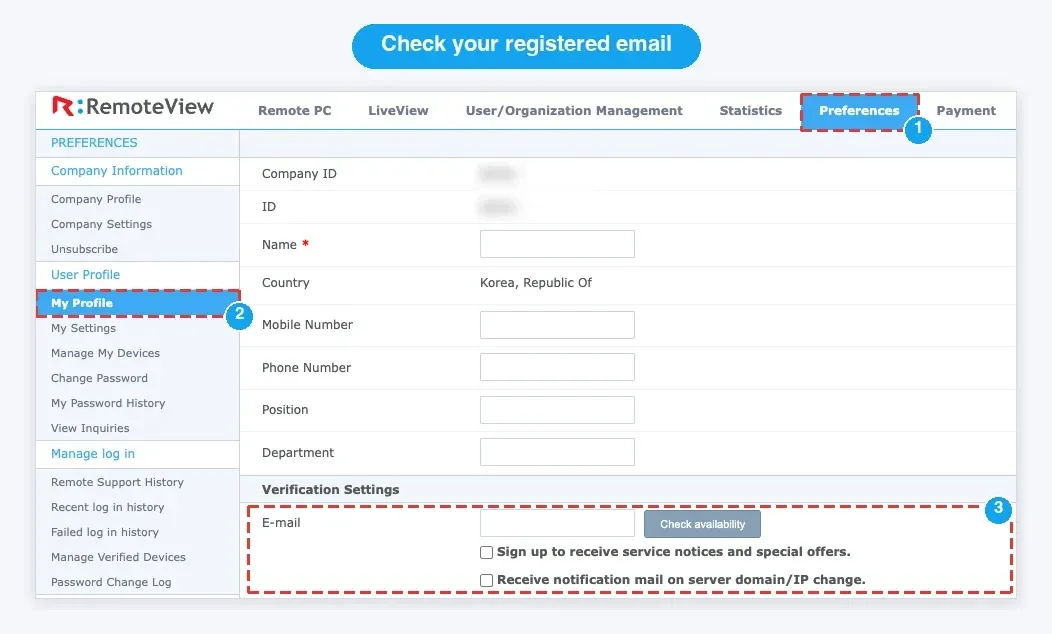
Check your registered email address under [Preferences] → [My Profile] → [Verification Settings].
💡 Security tip: Block unauthorized email changes
When an administrator turns on the [Email Security Enhancement] option, users who change their email address must verify both the current and the new address. This stops anyone who takes over an account from quietly redirecting verification emails to an address they control. (This is a separate safeguard that works independently of login 2FA.)
STEP 2. [Administrator] Turn on your company’s 2FA policy
Once everyone has confirmed their email address, the administrator chooses the verification method that fits the company’s security policy and turns it on.
Where to set it: Sign in with the administrator account → [Preferences] → [Company Settings] → [Use 2-Step Verification] → select [Use All] and choose the method (Email or OTP)
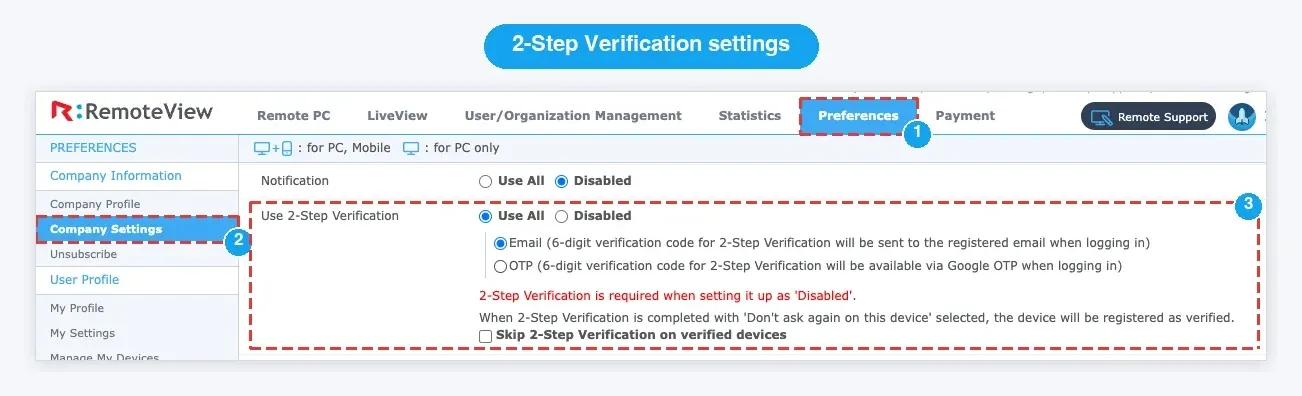
Turn on [Use 2-Step Verification] and choose Email or OTP under [Company Settings].
📌 Notes for administrators and users
Turning 2FA off also requires verification: If an administrator switches 2FA back to [Disabled], the change applies only after the administrator completes their own 2FA.
Skip verification on trusted devices: If the administrator allows [Skip 2-Step Verification on verified devices], users can tick [Don’t ask again on this device] in the verification window. They then won’t be asked for a code every time they sign in from a trusted office PC or personal device.
3. [How it works] Email verification vs. OTP verification
Users sign in as follows, depending on the method the administrator has chosen.
① Email verification: Enter the 6-digit code from your inbox
No smartphone app needed. You simply enter the code sent to the email address registered on your account.
Extra protection (remote PC access verification): Depending on the administrator’s settings, RemoteView can ask for email verification not only when you sign in to the web console but again when you start a remote control session on an individual remote PC (agent). In that case, a separate verification window opens before the session connects, and you enter the code sent to your registered email. Administrators can turn this on under [Company Settings] → [Use Agent access authentication] by selecting [Use All] and Email.
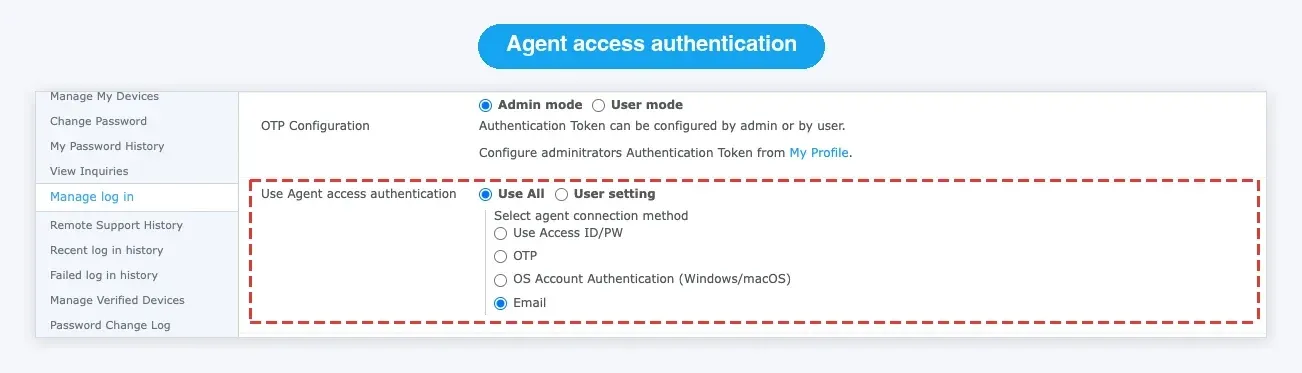
Require email verification when connecting to a remote PC under [Use Agent access authentication].
② OTP verification: Confirm with a mobile authenticator app
You enter a 6-digit one-time code generated in real time by an authenticator app on your smartphone, such as Google Authenticator. There’s no need to open your inbox, so verification is instant, and the code never travels over email.
■ First time only: Add your RemoteView account to the app
The first time you use OTP, you need to link your smartphone authenticator app to your RemoteView account.
- Get your OTP key: Find your OTP key (or QR code) on the screen shown at sign-in, or in the setup email sent to your registered address. If the sign-in window asks for an OTP code you don’t have yet, click [Receive key by email] to have the key sent to you.
- Add the account to the app: Install and open Google Authenticator, then scan the QR code or enter the key manually to add your RemoteView account. A 6-digit code labeled RemoteView appears in the app.
- Complete the first verification: Enter the 6-digit code from the app on the RemoteView screen, and setup is done.
■ Every day: Sign in with OTP
4. [Easier sign-in] Sign in with your Google or Microsoft account (SSO)
If your company uses Google Workspace or Microsoft 365 for work accounts, you can link them through single sign-on (SSO) and sign in quickly without remembering or typing a separate RemoteView password.
STEP 1. [Administrator] Allow SSO sign-in
Where to set it: [Preferences] → [Company Settings] → [Account Integration Settings (SSO)] → set [Simple Login Settings] to [Enable] → tick the platforms to allow (Google and/or Microsoft)
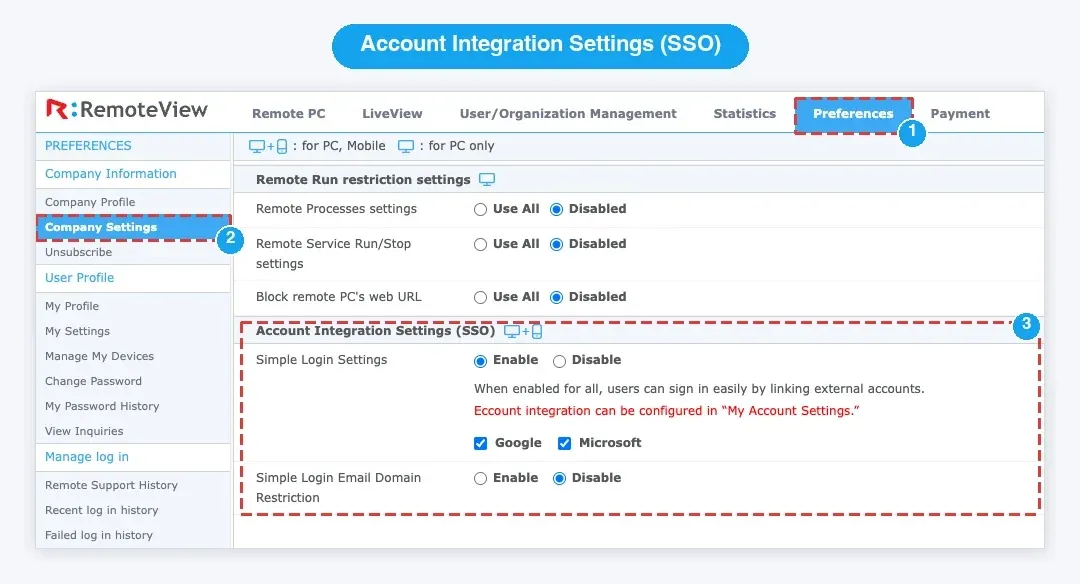
Enable Simple Login and choose Google and/or Microsoft under [Account Integration Settings (SSO)].
💡 Security tip: Allow only your company’s email domain
To stop employees from linking personal Gmail or other private accounts, also enable [Simple Login Email Domain Restriction]. Only accounts on the official company domain the administrator registers (e.g. @company.com) can then be linked.
STEP 2. [User] Link your work account (one time)
Once the administrator allows SSO, each user links their own account.
How to link: Sign in with your existing RemoteView ID → [Preferences] → [My Profile] → link your Google or Microsoft account in the account integration section
STEP 3. [User] Sign in with your linked account
(You can still sign in with your RemoteView ID and password after linking.)
📌 Good to know before using SSO
Supported versions: Available in the web console and mobile viewer (Android and iOS) on RemoteView 8.5.0 or later.
How 2FA works with SSO: When you sign in with SSO, RemoteView’s own 2FA screen does not appear. Instead, the security policy on your linked Google or Microsoft account (such as Google or Microsoft 2FA) applies. If you use SSO, make sure 2FA is turned on for the linked Google or Microsoft account itself.
5. At a glance: 2FA vs. SSO
Use the comparison below to decide which approach suits your company.
| Two-factor authentication (2FA) | Single sign-on (SSO) | |
|---|---|---|
| Main purpose | Stronger login security for the RemoteView account itself | One work account for everything and a simpler sign-in |
| How you sign in | RemoteView ID/password + email or OTP code | Click the Google or Microsoft icon on the sign-in screen |
| Who verifies you | RemoteView’s own authentication system | The linked Google or Microsoft security and authentication system |
| Setup | [Administrator] sets the method (Email/OTP) for everyone | [Administrator] allows SSO → [User] links their own account |
| Best for | Companies with frequent external access or strict control over their own accounts | Companies that standardize on Google Workspace or Microsoft 365 |
Safer remote work starts with your login settings
A secure remote work environment needs more than a protected remote session. It also needs account management that verifies who is connecting.
Beyond the 2FA and SSO covered here, RemoteView supports enterprise-grade security options you can fit to your company’s rules, including allowed IP/MAC address restrictions, overseas login blocking, and concurrent access control. Take a moment to review your company’s RemoteView security options today.
Start secure remote access with RemoteView.
Experience RemoteView’s remote control and security features for yourself.
Start 14-Day Free Trial Contact SalesRelated article
-

Remote Control Starts with a Secure Device | RemoteView Security
Feature
-

Choosing the Right Remote Kiosk Management Solution
Insight
-

A Threat Often Overlooked in Remote Access Security: Screen Leakage
Feature
-

Lessons from the Anydesk Hack on Remote Access Security
Insight
-

U.S. Workplace Trends in Remote Work.
Insight
-

What’s your company’s ‘Emergency Remote-Work’ plan for Violent Crimes?
Insight
-

How to do video conferencing using internal networks?
Feature
-

Implement Zero Trust with RemoteView!
Feature
-

Zero Trust: An essential security framework for remote working
Insight
-

How to use Single Sign-On(SSO) in a safe and accurate way?
Insight
-

Slow and unstable connection during remote access?
Manage your data usageInsight
-

Free Remote Control!
Do you know the risks?Insight
-

Work from home with Chromebook + RemoteView
for more secured telecommutingTip
-

VDI vs Remoteview
Use RemoteView, the cost-effective remote control tool!Insight
-

Tips for Working From Home with RemoteView
Tip
-

Time to consider productivity when working from home!
Insight
